
This post contains affiliate links.
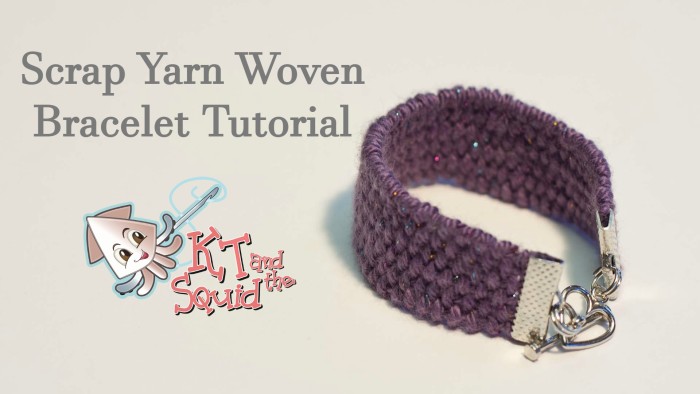
Ever get an awesome yarn for a project and have not enough yarn leftover for another project but just enough you feel bad throwing it away? These bracelets are perfect for small scraps of yarn. I used less than 6 yards so you really don’t need a lot.
The Squid was so excited to make these bracelets. We’re making one for each of her friends at school. I hope they like them! I had to help her with some of the attaching of the closure but she was able to do a lot of it on her own. It’s a great project for kids!
Below I have a photo tutorial and at the very bottom is a video I made if you’d like to watch that as well.
What You’ll Need

- Scrap Yarn.
- Like I said, I probably used less than 6 yards.
- For this tutorial I used Cascade Sunseeker. I thought the girls would enjoy the little but of sparkle.
- Yarn needle
- Cardboard or something ridged.
- I think the piece I used came from a box yarn was shipped in 😉
- The cardboard needs to be at least as long as the bracelet you want to make.
- Tape measure and a wrist to measure.
- The Squid is 7 and very thin. Her wrist was just under 5″.
- Pen or pencil
- Glue
- I prefer E6000. I know it holds well but you can use the glue of your choice. I know they make a special one for jewelry.
- Ribbon ends
- Nylon coated pliers.
- I found mine at Walmart but they can be found online as well. You’ll want to use these because regular pliers will scratch the ribbon ends. You could probably use some cloth between regular pliers and the ribbon ends if you can’t or don’t want to buy the special pliers.
- The closure of your choice
- Here’s what I used. Again, I found these at Walmart. You can also find them on Amazon or at Joanns.

- Small split rings: You could used jump rings but I thought these would be more secure. You’ll also need something to get them open (they are like little key chains). I used a large sewing needle but they also make special pliers.
- Toggle clasp: I found a package with an assortment of these. I thought they were cute and easy for the girls to use. You could also use something like a claw closure.
- Here’s what I used. Again, I found these at Walmart. You can also find them on Amazon or at Joanns.
Instructions
Start by measuring the recipients wrist. You can look up bracelet measurements if don’t have someone to measure. Mark the length on your cardboard. This will tell you about how long to make the bracelet (keep in mind the closure will add some length).

Mark the width of the ribbon end on the cardboard. This will tell you about how wide to make the bracelet.

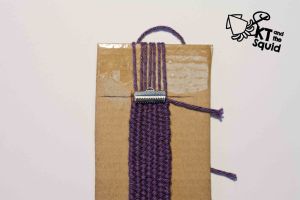
Wrap enough yarn around the cardboard lengthwise to make the width of the ribbon end. For the photos I wrapped it 7 times in the video I wrapped it 6 times (Sunseeker is a DK yarn).

Secure the yarn with a knot and push it to the back side of the cardboard.

Cut a long length of yarn. I cut 4 yards (I measure a yard from the tip of my nose to the tip of my outstretched arm). I had over a yard leftover. 3 yarns is probably enough but just to be on the safe side I’d go with 4. Remember this can vary if you are using a different weight yarn or making a thinner or thicker bracelet.
Start to weave. Weave your needle under, over, under…across the yarn on the cardboard. Pull the yarn through leaving a small tail at the end (this will be trimmed later).

Then weave over, under, over… the other way. Because I had 7 wraps on my cardboard I ended with an under so the next pass I started with an over. But if you look at the video I had 6 wraps so I ended with an over and had to start with an under on the second pass (and every pass). You’ll know if you did it wrong because it will all come out 😉

It may feel a bit sloppy at first but the more you weave the neater it will start to look.

As you weave use your needle to push up the yarn. You can use the tip to push up in between each strand of wrapped yarn.
 You can also push up as you weave your needle to do the next pass.
 You want to push it up enough so that the yarn wrapped around the cardboard does not peek through. If you weave too loose, as the bracelet is worn it will start to pull apart leaving large gaps (this happened to our test bracelet).
As you go check that the tension is the same throughout. You can use the end of the needle to fix any unevenness as you go (you can see me do this in the video).

Weave to a little before the bottom mark (remember the closure will be adding some length). I put the ribbon end back on the weaving to make sure it will fit nicely. Mine was a little big so I just pulled the weaving a bit tighter at the ends.
At this point you could flip the cardboard over and make a second bracelet on the back.

Put a little glue over the ends. This is to hold everything in place. Try not to put too much glue or it wont fit very well in the ribbon ends. It takes 24 hours to dry completely but should be set enough to handle in a few hours. I waited 2 hours and it was fine.

Cut the bracelet off the cardboard. Trim any ends right up to the glue. One reason I like the E6000 is it’s soft enough I can cut it away if I put too much glue.

If you’d like to make the bracelet more durable you could glue a length of ribbon on the back at this point.

Slide the ends into the ribbon ends.
 Use the nylon coated pliers to squeeze them closed.


Next, attach your split rings and closure. I used a large sewing needle to get the split rings open so I could slide in the ribbon ends and toggle clasps. Like I said, you can get special pliers for this but the needle worked just fine. You could also use some thin tweezers…whatever you can get in there to split it open 🙂


Once the closures are on you’re done! Below is a video I made if you’d like to see the whole process. Enjoy!
This is such a cute idea for girls! This would be a great project for a sleep over. Every knitter and crocheter has scrap yarn!